
Our Process: Start to Finish
-
1. CONCEPT
Before a custom bronze sculpture is created for a commission, the client will discuss with David L. Spellerberg, President of the GABW, Inc., their vision of what the finished bronze sculpture in their mind will look like. After a considerable amount of brainstorming, Mr. Spellerberg and his staff at Great American Bronze Works (GABW) will submit a sketch or digital rendering on the computer of what the proposed bronze sculpture will look like.

-
2. PHOTOS AND MEASUREMENTS
In most cases, if someone has a specific grandchild, child, favorite pet or animal, etc. that they wish to recreate in bronze, then a photo shoot with specific measurements taken is essential in ensuring the accuracy and the ability to capture the likeness of the subject in the finished bronze work of art.


-
3. CLAY MODEL
The clay model is created from photos, measurements, and/or any sketches designed with the input of the client. The clay model is very important in determining the quality of the finished bronze sculpture, because if the correct detail and expression isn't captured in the clay model, it’s not going to magically appear in the finished bronze sculpture. Many hours, as well as a tremendous amount of work are put forth by the artist and staff to create an accurate clay model. Depending upon the size of the sculpture, this process normally takes about 4-6 weeks. Pictures of this model as it is being created are shared with the client so they can give us their input into the creation process. GABW, Inc. feels that it is important that our clients are involved in this process.


-
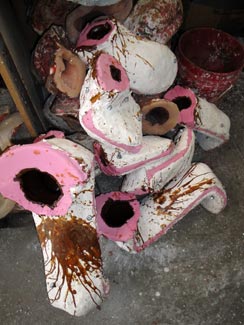
4. MOLD MAKING
Once the clay model has been approved by the client, the next step of the process is creating a silicone mold off of the surface of the clay model itself. This mold is very important to capture the detail of the original clay model so that the wax pattern that will be generated by this mold, will be accurate in every detail. The mold making process, depending upon the size of the project, usually takes 2-3 weeks. Each silicone mold that is created requires three layers of silicone to be applied with a brush to the clay model. The third layer is reinforced with fiberglass cloth to give the mold more strength and durability. The final step of the mold making process is creating a plaster jacket to surround the silicone mold. This jacket keeps the mold in its proper shape and position so there is no distortion from movement of the silicone when the wax is poured into the mold.


-
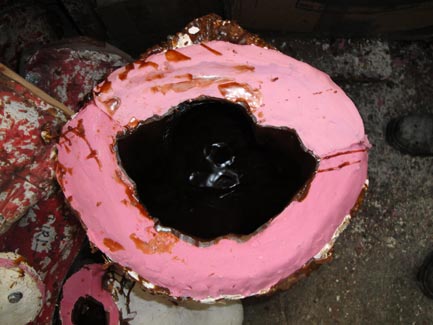
5. WAX POURING
The next step of the process is the "lost wax technique" - pouring melted wax into the silicone mold to create an exact duplicate pattern of the original clay model in wax. Three coats of wax are poured into the mold that will produce a finished wax pattern approximately 1/8” in thickness. The pouring of the first coat of wax is most important in capturing the exact detail from the inside of the mold. The first coat is poured at 220 degrees Fahrenheit. It is very important when pouring this first coat of wax that the wax is poured into the mold very gently and on an angle to prevent turbulence and the creation of air bubbles that will appear as imperfections on the outside surface of the finished wax pattern. After 15 minutes of cooling, the second coat of wax is poured into the mold at approx. 200 degrees. The final, third coat is poured approximately a half hour later, at a temperature of 180 degrees. The reason why the temperature is dropped between each pouring is that the lower temperature will prevent the previous wax from being melted out. The wax pattern must now be removed from the mold and this can be tricky and difficult, depending upon the number of undercuts and shape of the mold itself. It is very important that silicone spray has been applied to the mold before the wax was poured to help the wax come out of the mold after the final coat has been applied.

-
6. WAX CLEANUP
The wax pattern cleanup is a very important process because this is where any imperfections in the wax pattern are removed and corrected. These imperfections are usually air bubbles or part lines. Air bubbles may be created in the pouring of the wax itself and part lines are a part of the process because molds are put together in parts or sections. Usually there is a top and bottom to each mold. Where these two molds come together, there will be some kind of a part line. These air bubbles and part lines must be filled and removed by a skilled wax artisan.


-
7. THE GATING PROCESS
Each of the cleaned wax patterns must now be gated to begin the bronze casting process. This gating procedure is a means to assure that when the molten bronze is poured, it will flow evenly throughout all areas of the wax pattern. The gating process requires wax, gates, heavier supports, and thinner wax sprues and runners to be connected and joined to the various parts of the wax pattern. The wax pattern is now referred to a “tree”. Experience of the artisan doing this work is important to assure a quality finished bronze casting part.

-
8. THE DIPPING PROCESS
The dipping process is the next step where the tree is dipped into a 55 gallon tank which is filled with a mixture of very fine powdered silica sand and a liquid binding agent (glue). This binding agent will allow the powdered sand in the tank to stick to the wax surface of the tree. This “tree” must be dipped into the tank at least once a day and allowed to dry. This process is repeated for approximately 10 days depending upon the size of the tree and the thickness of the wax. After the first day of dipping, each consecutive day of dipping coarser grades of silica sand will be thrown onto the surface of the wet tree, building the thickness of the shell. Once this tree has been dipped for the proper amount of times, the tree will have nearly ¾ of an inch of silica sand adhered to the outside and inside surface of the tree itself. The dipped tree is now called a “shell”. If the wax tree weighed 10 lbs. at the beginning of the dipping process, then the shell, after 10 days of dipping, will probably weigh about 60 lbs. The shell itself is now rock hard which will be very important in the next step of the casting process.


-
9. BURN-OUT
The opening or the top of the shell will be cut off, exposing the wax that was covered by the dipping shell material. This opening will be placed down into an oven or kiln. The oven is heated to approximately 800 degrees for an hour. During this time, every drop of the wax that was inside that shell will flow out of the opening in the bottom of the shell. This is where the term “lost wax” comes from. Meaning that the wax has been evacuated from the shell itself and “lost”. Everything that was wax is now void or hollow. That void or hollow space is only 1/8 of an inch thick, which was the thickness of the original wax pattern that was evacuated. The evacuated wax can be recycled for future wax pouring.

-
10. BRONZE POURING
Immediately after the wax has been completely melted or evacuated from the shell, the 800 degree shell is then taken out of the oven and placed into a sandbox with the opening facing upward. At this point a crucible that holds approximately 150 lbs of molten bronze has been heated to 2200 degrees Fahrenheit and is now very carefully poured from the crucible into the opening of the shell. The molten bronze runs down the gates and sprues or runners into all parts of the hollow shell. Bronze is an alloy of 85% copper, 5% lead, 5% tin, and 5% zinc. This poured shell must be allowed to cool for nearly 4 hours before it can be handled.

-
11. KNOCK-OUT
In order to use the poured bronze casting which is encased within the ¾ of an inch rock hard shell material from the dipping process, the shell must be carefully knocked off the surface of the bronze casting part. This is done with the use of handheld air hammers which will remove 95% of the shell and the remaining 5% is removed by being sandblasted with very fine sand.

-
12. CUT OFF
The cleaned bronze casting part still has the various gates, sprues and runners attached to its surface. These bronze gates, sprues and runners were originally applied as wax to the wax pattern and through the casting process became bronze as did the wax pattern itself. All of these bronze gates, sprues and runners must be cut off with handheld disc grinders. The cutoff bronze parts can be remelted and reused in future pours.

-
13. WELDING
The individual bronze sculpture casting parts are then welded together by a skilled artisan welder.

-
14. CHASING
After the individual casting parts have been welded together, a foundry artisan will use various air tools with different grinding bits to clean up the welds and blend in the exact detail that was created by the artist in the original clay model. This is an art which requires much training and experienced to create a finished bronze sculpture with no signs of having been welded together. GABW, Inc. has more than 30 years of experience in creating and casting the finest in bronze sculpture. GABW, Inc. also doing business as the National Heritage Collectors Society, is world renowned for the quality of our finished bronze sculptures.

-
15. FINAL SANDBLASTING
Each finished bronze sculpture must be sandblasted one last time with very fine glass beads before the patination process can begin.


-
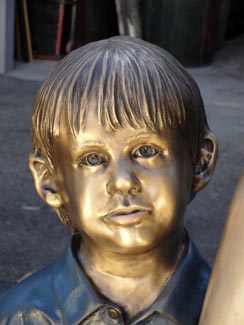
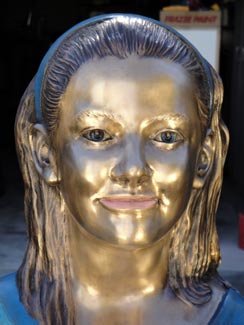
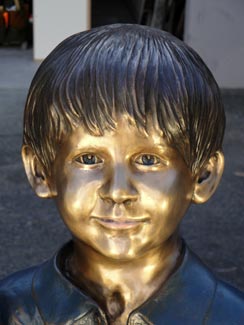
16. PATINATION
The patina of the finished bronze sculpture is achieved through the use of heat and acid applied to the surface of the sculpture. This is another art form of the process which gives the sculpture its unique finish. All of the weeks and months of creation are culminated with this final process. I have always felt that you can take a great casting and apply a very average patina and you will be left with an average work of art. Unfortunately, in the reverse, you can take an average casting and apply a great patina to it, and be left with a magnificent work of art. Now, just imagine the results of a great casting with a great patina!
-
Shades of black, brown and green are created on the surface of the statue through the application of liver of sulfur, ferric nitrate, and cupric nitrate. An additional uniqueness can be created by applying paint pigments to the surface of the sculpture. This process is called a poly-chrome patina. The surface of the finished bronze sculpture is then protected with several layers of applied paste wax which is then polished when dry. For outdoor sculptures, a spray sealer or lacquer may be applied. Indoor sculptures may be cleaned from time to time with the use of armor-all or Pledge. In such case, the cleaning agent should be sprayed onto a terry-cloth towel, and then applied to the sculpture. This will avoid a buildup of wax in the recessed areas of the sculpture. Outdoor sculptures may be cleaned with armor-all or W-D 40 on a regular basis. The most important consideration is to not allow outdoor works of art to be continuously sprayed by sprinklers. Sprinkler water contains calcium and when baked on by the sun, will create white spots on the surface of a statue.


-
I trust from this brief explanation that you have a greater appreciation of what goes into creating and casting a bronze sculpture and realize why such a work of art will be a valuable treasure that may be passed on to future generations as an heirloom.


Copyright 2009, Great American Bronze Works, Inc. All rights reserved.
2139 Lindengrove, Westlake Village, CA 91361 (805) 495-5957